
Content Index
- What is Pulumi
- Difference between Pulumi vs Terraform
- Pulumi Installation and Setup
- Creation of S3 bucket on AWS
- Hosting a static website
- Deploy the infrastructure
- Cleaning up infrastructure
- Pulumi Cloud
What is Pulumi? 🤔
Pulumi is a modern Infrastructure as Code (IaC) tool that allows you to define and manage your cloud infrastructure using programming languages like JavaScript, TypeScript, Python, and Go. Unlike traditional IaC tools that rely on domain-specific languages, Pulumi lets you use general-purpose languages to write and manage your infrastructure code. This enables developers to leverage familiar languages and tooling, making IaC more accessible and versatile.
Pulumi vs. Terraform: What’s the Difference? 🤷♂️
-
Language Flexibility: Pulumi uses general-purpose programming languages (JavaScript, Python, etc.), while Terraform uses its own domain-specific language (HCL).
-
State Management: Terraform maintains a state file to track infrastructure changes, which can sometimes be cumbersome. Pulumi, on the other hand, uses a more dynamic approach and integrates directly with cloud APIs.
-
Integration and Extensibility: Pulumi offers seamless integration with modern CI/CD pipelines and cloud-native tools, providing a more developer-centric experience.
Now we can got the basic understanding what is pulumi and how its helps in creating IAC , lets see how to install Pulumi and Set it up
Pulumi Installation and Setup
Step 1: Install Pulumi
Here we will see how to install on Linux , But it also supported on macOS and Windows
$ curl -fsSL https://get.pulumi.com | shVerify installation
$ pulumi version
v3.125.0
Alternatively, download the Pulumi binary for other OS installation from the official website
If this doesn’t work, you may need to restart your terminal to ensure the folder containing the pulumi command is on your PATH.
Next, install the required language runtime, if you have not already.
Step 2: Install Language Runtime
You can choose any choice of Language you want from the list , here we will choose Python Language as Language Runtime
- TypeScript
- JavaScript
- Python
- Go
- C#
- Java
- YAML
Step 3: Configure Pulumi to access your AWS account
Pulumi requires cloud credentials to manage and provision resources. You must use an IAM user account that has programmatic access with rights to deploy and manage resources handled through Pulumi.
If you have previously installed and configured the AWS CLI, Pulumi will respect and use your configuration settings.
If you don’t have the AWS CLI installed, or you plan on using Pulumi in a CI/CD pipeline, retrieve your access key ID and secret access key and then set the AWS_ACCESS_KEY_ID and AWS_SECRET_ACCESS_KEY environment variables on your workstation:
Linux
export AWS_ACCESS_KEY_ID="<YOUR_ACCESS_KEY_ID>" \
export AWS_SECRET_ACCESS_KEY="<YOUR_SECRET_ACCESS_KEY>"
AWS profiles are also supported:
export AWS_PROFILE="<YOUR_PROFILE_NAME>"You can configure via AWS CLI :
$ aws configure For additional information on setting and using AWS credentials, see AWS Setup
Step 4: Pulumi & AWS: Create new project
Now that you have set up your environment by installing Pulumi, installing your preferred language runtime, and configuring your AWS credentials, let’s create your first Pulumi program.
Python
$ mkdir pulumi-aws && cd pulumi-aws
$ pulumi new aws-python
The pulumi new command creates a new Pulumi project with some basic scaffolding based on the cloud and language specified.
First, you will be asked for a project name and project description. Hit ENTER to accept the default values or specify new values.
This command will walk you through creating a new Pulumi project.

Enter a value or leave blank to accept the (default), and press <ENTER>.
Press ^C at any time to quit.

project name: (quickstart)
project description: (A minimal AWS Pulumi program)
Created project 'quickstart'
Next, you will be asked for a stack name. Hit ENTER to accept the default value of dev.
Please enter your desired stack name.
To create a stack in an organization, use the format <org-name>/<stack-name> (e.g. `acmecorp/dev`).
stack name: (dev)
Created stack 'dev'
Finally, you will be prompted for some configuration values for the stack. For AWS projects, you will be prompted for the AWS region. You can accept the default value or choose another value like us-west-2 or choose the value you choosen when setting up aws account
aws:region: The AWS region to deploy into: (us-west-2)
Saved config
NOTE
What are projects and stacks? Pulumi projects and stacks let you organize Pulumi code. Consider a Pulumi project to be analogous to a GitHub repo—a single place for code—and a stack to be an instance of that code with a separate configuration. For instance, project
foomay have multiple stacks for different deployment environments (dev,test, orprod), or perhaps for different cloud configurations (geographic region for example). See Organizing Projects and Stacks for some best practices on organizing your Pulumi projects and stacks.
After the command completes, the project and stack will be ready.
Pulumi & AWS: Creation of S3 bucket on AWS
- The Command will create some files lets review it
quickstart/
├── Pulumi.yaml
├── Pulumi.dev.yaml
├── __main__.py
├── requirements.txt
└── .gitignore-
Pulumi.yamldefines the project. -
Pulumi.dev.yamlcontains configuration values for the stack you just initialized. -
__main__.pyis the Pulumi program that defines your stack resources.
Let’s examine __main__.py
import pulumi
from pulumi_aws import s3

# Create an AWS resource (S3 Bucket)
bucket = s3.Bucket('aws-bucket')

# Export the name of the bucket
pulumi.export('bucket_name', bucket.id)
This Pulumi program creates a new S3 bucket and exports the name of the bucket.
pulumi.export('bucket_name', bucket.id)- Let’s go ahead and deploy your stack:
$ pulumi upThis command evaluates your program and determines the resource updates to make. First, a preview is shown that outlines the changes that will be made when you run the update:
Previewing update (dev):

     Type                 Name            Plan
 +   pulumi:pulumi:Stack  quickstart-dev  create
 +   └─ aws:s3:Bucket     aws-bucket      create

Resources:
    + 2 to create

Do you want to perform this update?
> yes
  no
  details
Once the preview has finished, you are given three options to choose from. Choosing details will show you a rich diff of the changes to be made. Choosing yes will create your new S3 bucket in AWS. Choosing no will return you to the user prompt without performing the update operation.
Do you want to perform this update? yes
Updating (dev):

     Type                 Name            Status
 +   pulumi:pulumi:Stack  quickstart-dev  created (4s)
 +   └─ aws:s3:Bucket     aws-bucket      created (2s)

Outputs:
    bucketName: "aws-bucket-58ce361"

Resources:
    + 2 created

Duration: 5s
Remember the output you defined in the previous step? That stack output can be seen in the Outputs: section of your update. You can access your outputs from the CLI by running the pulumi stack output [property-name] command. For example you can print the name of your bucket with the following command:
pulumi stack output bucket_nameRunning that command will print out the name of your bucket.
NOTE
The extra characters you see tacked onto the bucket name (
-58ce361) are the result of auto-naming, a feature that lets you use the same resource names across multiple stacks without naming collisions. You can learn more about auto-naming in the Concepts docs.
If you are using the Pulumi Cloud backend, you can follow the “View in Browser” link displayed in the CLI output. This will open the update in Pulumi Cloud, where you can view the output and explore detailed information about your stack such as its activity, resources, and configuration. we will see it in later part
Tips
- Just like Terraform plan so get a
dry runof the infrastructure , we can make sure of pulumi command like this , so it will create a preview without actually deploying the infra
$ pulumi preview Now that the bucket has been provisioned, let’s modify the program to host a static website.
Pulumi & AWS: Hosting a static website
- Now that your S3 bucket is provisioned, let’s add a file to it. First, from within your project directory, create a new file called
index.htmlfile along with some content:
echo '<html>
    <body>
        <h1>Hello, Pulumi!</h1>
    </body>
</html>' > index.html
Now, open the program and add this file to the S3 bucket. To do this, you’ll use Pulumi’s FileAsset resource to assign the content of the file to a new BucketObject:
- In
__main__.py, create a new bucket object by adding the following right after creating the bucket itself:
# Create an S3 Bucket object
bucketObject = s3.BucketObject(
    'index.html',
    bucket=bucket.id,
    source=pulumi.FileAsset('./index.html')
)
This bucket object is part of the Bucket that we deployed earlier because we reference the bucket name in the properties of the bucket object.
We refer to this relationship as the BucketObject being a child resource of the S3 Bucket that is the parent resource. This is how Pulumi knows what S3 bucket the object should live in.
- Now let’s deploy your changes.
$ pulumi upPulumi will run the preview step of the update, which computes the minimally disruptive change to achieve the desired state described by the program.
Previewing update (dev):

     Type                    Name            Plan
     pulumi:pulumi:Stack     quickstart-dev
 +   └─ aws:s3:BucketObject  index.html      create

Resources:
    + 1 to create
    2 unchanged

Do you want to perform this update?
> yes
  no
details- Choosing
yeswill proceed with the update and upload theindex.htmlfile to your bucket:
Do you want to perform this update? yes
Updating (dev):

     Type                    Name            Status
     pulumi:pulumi:Stack     quickstart-dev
 +   └─ aws:s3:BucketObject  index.html      created (0.98s)


Outputs:
    bucketName: "aws-bucket-58ce361"

Resources:
    + 1 created
    2 unchanged

Duration: 3s- Once the update has completed, you can verify the object was created in your bucket by checking the AWS Console or by running the following AWS CLI command:
$ aws s3 ls $(pulumi stack output bucket_name)Notice that your index.html file has been added to the bucket:
2024-07-21 17:01:06 118 index.html
Now that index.html is in the bucket, update the program to turn the bucket into a website.
- Update the
Bucketdeclaration to add awebsiteproperty and makeindex.htmlthe home page of the website:
bucket = s3.Bucket("aws-bucket",
    website=s3.BucketWebsiteArgs(
        index_document="index.html",
    ),
)-
For the bucket itself, you’ll need two new resources: a
BucketOwnershipControlsresource, to define the bucket’s file-ownership settings, and aBucketPublicAccessBlockresource to allow the bucket to be accessed publicly. -
For the
BucketObject, you’ll need an access-control (ACL) setting ofpublic-readto allow the page to be accessed anonymously (e.g., in a browser) and a content type oftext/htmlto tell AWS to serve the file as a web page. Add the following lines to your program, updating theBucketObjectin place:
ownership_controls = s3.BucketOwnershipControls(
    'ownership-controls',
    bucket=bucket.id,
    rule=s3.BucketOwnershipControlsRuleArgs(
        object_ownership='ObjectWriter',
    ),
)

public_access_block = s3.BucketPublicAccessBlock(
    'public-access-block', bucket=bucket.id, block_public_acls=False
)

bucket_object = s3.BucketObject(
    'index.html',
    bucket=bucket.id,
    source=pulumi.FileAsset('index.html'),
    content_type='text/html',
    acl='public-read',
    opts=pulumi.ResourceOptions(depends_on=[public_access_block, ownership_controls]),
)-
Note that the
BucketObjectalso includes the Pulumi resource optiondependsOn. This setting tells Pulumi that theBucketObjectrelies indirectly on theBucketPublicAccessBlock, which is responsible for enabling public access to its contents. If you omitted this setting, the attempt to grantpublic-readaccess toindex.htmlwould fail, as all S3 buckets and their objects are blocked from public access by default. -
Finally, at the end of the program, export the resulting bucket’s endpoint URL so you can browse to it easily:
pulumi.export('bucket_endpoint', pulumi.Output.concat('http://', bucket.website_endpoint))
Pulumi & AWS: Deploying the Infrastructure
NOTE
You may need to grant permissions to your S3 object,
index.html. Ensure it has public read access if intended.
- Update your stack to deploy these changes to AWS:
$ pulumi upAgain, you’ll see a preview of the changes before they’re deployed:
Previewing update (dev):

     Type                               Name                 Plan       Info
     pulumi:pulumi:Stack                quickstart-dev
 ~   ├─ aws:s3:Bucket                   aws-bucket           update    [diff: +website]
 +   ├─ aws:s3:BucketOwnershipControls  ownership-controls   create
 +   ├─ aws:s3:BucketPublicAccessBlock  public-access-block  create
 ~   └─ aws:s3:BucketObject             index.html           update     [diff: ~acl,contentType]

Outputs:
  + bucketEndpoint: output<string>

Resources:
    + 2 to create
    ~ 2 to update
    4 changes. 1 unchanged

Do you want to perform this update?
> yes
  no
  details
Choose yes to perform the deployment:
Do you want to perform this update? yes
Updating (dev):

     Type                               Name                 Status              Info
     pulumi:pulumi:Stack                quickstart-dev
 ~   ├─ aws:s3:Bucket                   aws-bucket           updated (3s)        [diff: +website]
 +   ├─ aws:s3:BucketOwnershipControls  ownership-controls   created (0.84s)
 +   ├─ aws:s3:BucketPublicAccessBlock  public-access-block  created (1s)
 ~   └─ aws:s3:BucketObject             index.html           updated (0.53s)     [diff: ~acl,contentType]

Outputs:
  + bucketEndpoint: "http://aws-bucket-dfd6bd0.s3-website-us-east-1.amazonaws.com"
    bucketName    : "aws-bucket-dfd6bd0"

Resources:
    + 2 created
    ~ 2 updated
    4 changes. 1 unchanged

Duration: 8s- When the deployment completes, you can check out your new website at the URL in the
Outputssection of your update or make acurlrequest and see the contents ofindex.htmlin your terminal:
curl $(pulumi stack output bucket_endpoint)- And you should see:
<html>
    <body>
        <h1>Hello, Pulumi!</h1>
    </body>
</html>
Pulumi & AWS: Cleaning up Infrastructure
- Now that you’ve seen how to deploy changes to our program, let’s clean up and tear down the resources that are part of your stack.
To destroy resources, run the following:
$ pulumi destroy- You’ll be prompted to make sure you really want to delete these resources. This can take a minute or two; Pulumi waits until all resources are shut down and deleted before it considers the destroy operation to be complete.
Previewing destroy (dev):

     Type                               Name                 Plan
 -   pulumi:pulumi:Stack                quickstart-dev       delete
 -   ├─ aws:s3:BucketObject             index.html           delete
 -   ├─ aws:s3:BucketOwnershipControls  ownership-controls   delete
 -   ├─ aws:s3:BucketPublicAccessBlock  public-access-block  delete
 -   └─ aws:s3:Bucket                   aws-bucket           delete

Outputs:
  - bucketEndpoint: "http://aws-bucket-dfd6bd0.s3-website-us-east-1.amazonaws.com"
  - bucketName    : "aws-bucket-dfd6bd0"

Resources:
    - 5 to delete

Do you want to perform this destroy? yes
Destroying (dev):

     Type                               Name                 Status
 -   pulumi:pulumi:Stack                quickstart-dev       deleted
 -   ├─ aws:s3:BucketObject             index.html           deleted (1s)
 -   ├─ aws:s3:BucketPublicAccessBlock  public-access-block  deleted (0.28s)
 -   ├─ aws:s3:BucketOwnershipControls  ownership-controls   deleted (0.47s)
 -   └─ aws:s3:Bucket                   aws-bucket           deleted (0.39s)

Outputs:
  - bucketEndpoint: "http://aws-bucket-dfd6bd0.s3-website-us-east-1.amazonaws.com"
  - bucketName    : "aws-bucket-dfd6bd0"

Resources:
    - 5 deleted

Duration: 4s
To delete the stack itself, run pulumi stack rm. Note that this removes the stack entirely from Pulumi Cloud, along with all of its update history.
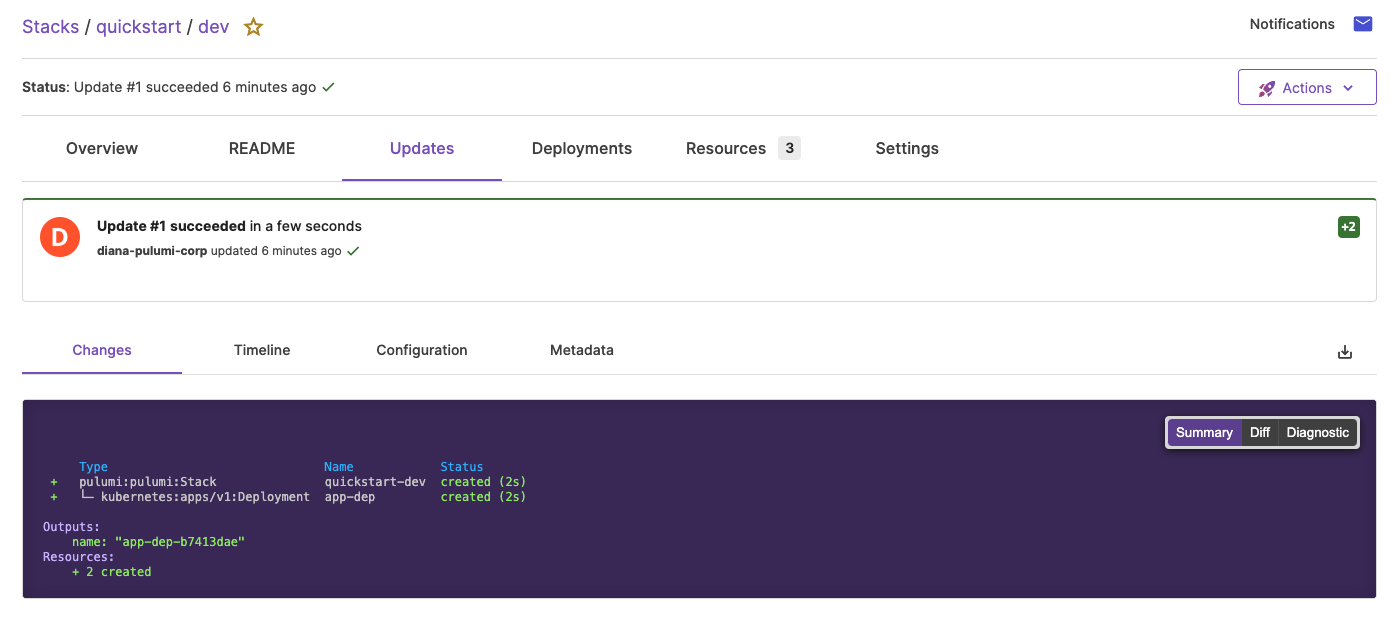
Pulumi Cloud
We have seen how to manage an infra using Pulumi CLI but just as terraform cloud giving an UI based experience to manage cloud , Pulumi also offers a great UI based Experience to manage Infrastructure
Here is the example of Pulumi Cloud
Congratulations! You’ve successfully provisioned some cloud resources using Pulumi. By completing this guide you have successfully:
lets recap what we learned so far :
- Created a Pulumi new project.
- Provisioned a new S3 bucket.
- Added an
index.htmlfile to your bucket. - Served the
index.htmlas a static website. - Destroyed the resources you’ve provisioned.
With Pulumi’s flexibility and power, managing cloud infrastructure has never been easier or more intuitive.
Feel free to ask questions or share your thoughts . Happy coding! 🚀👨💻