

By running performance tests continuously and automatically, you can identify and correct performance regressions as they occur. One way to do this is by integrating performance testing into your development process.
In this step-by-step post, we explore how to do just that, using Grafana k6 and GitHub Actions.
Lets understand what is K6 and Grafana
What is K6 ?
-
k6 is an open source load testing tool to test the performance of APIs, microservices, and websites. Developers use k6 to test a system’s performance under a particular load to catch performance regressions or errors.
-
Integrating k6 performance tests into a new or existing GitHub Actions pipeline is quick and easy, especially using the official marketplace app. Grafana k6 has two official GitHub actions available in the GitHub marketplace to make it easy to run performance tests in a GitHub action workflow. The first is setup-k6-action, which is used to configure k6 in the workflow pipeline, and the second is run-k6-action, which is used to execute the k6 tests.
What is Github Action ?
GitHub Actions is a tool that enables developers to create custom workflows for their software development lifecycle directly inside their GitHub repositories. As of 2019, GitHub Actions now supports full CI/CD pipelines.
If you haven’t used GitHub Actions before, we recommend looking at the following links to get a sense of how it works:
Writing your performance test
We’ll start small by writing a simple test that measures the performance of a single endpoint. As with most, if not all, development efforts, performance testing yields the best results if we work in small increments, iterating and expanding as our knowledge increases.
Our test will consist of three parts:
- An HTTP request against our system under test (SUT).
- A load configuration controlling the test duration and amount of virtual users.
- A performance goal, or service level objective (SLO), defined as a threshold.
- A scenario for the test case for our system
Creating the test script
When we execute our test script, each virtual user will execute the default function as many times as possible until the duration is up. To make sure we don’t flood our system under test, we’ll make the virtual user sleep for a second before it continues.
import http from 'k6/http';
import { sleep } from 'k6';

export default function () {
  const res = http.get('https://quickpizza.grafana.com/');
  sleep(1);
}- Here , we are using JavaScript to write test case for our URL
- in the
export defaultfunction we are using an example URL to run our test on it
Configuring the load
- We’ll configure our test to run 50 virtual users continuously for one minute. Because of the sleep we added earlier, this will result in just below 50 iterations per second, giving us a total of about 2900 iterations.
import http from 'k6/http';
import { sleep } from 'k6';

export const options = {
  duration: '1m',
  vus: 50,
};

export default function () {
  const res = http.get('https://quickpizza.grafana.com/');
  sleep(1);
}- Here ,
vusstands for virtual users to create load K6 creates Virtual users so that we can increase the number of users to increase the load on the URL for a period of time which is know asduration
Running the Test Locally
Once the load test case is ready , before running on Grafana cloud , first we will run our test locally to check whats the output of the load test .
To run the test , run this command in the terminal
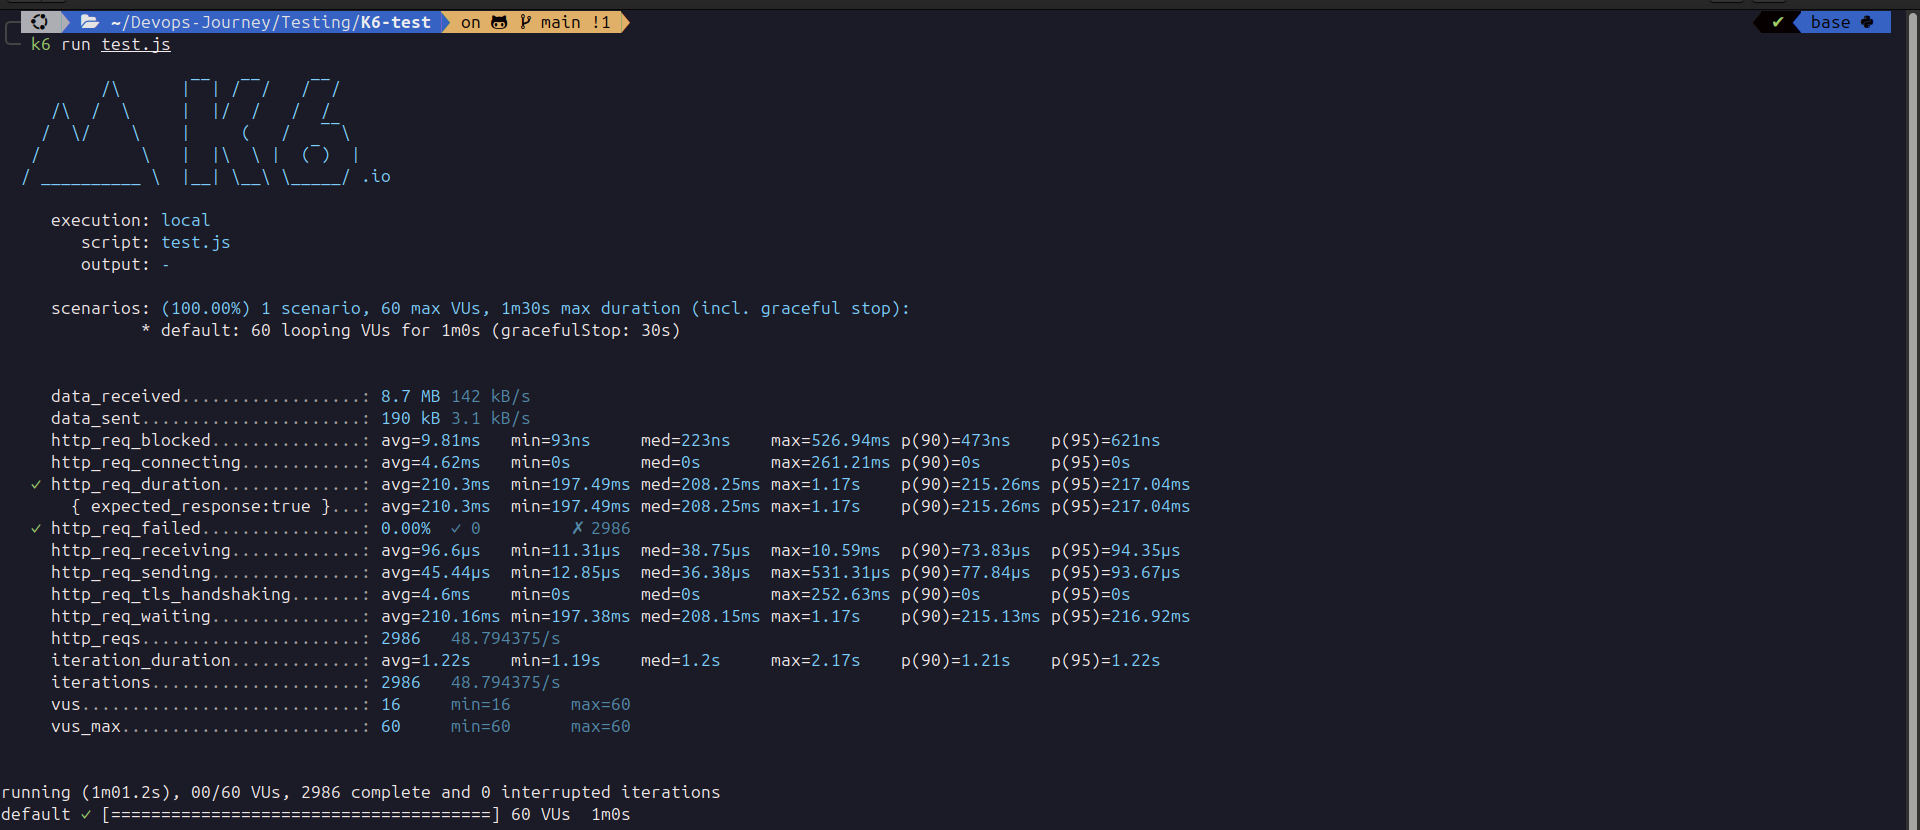
k6 run test.js- Here
test.jsis our name of the load test file ,we can name it as any name we want
After running the test locally , this is just an example output
Configuring our thresholds
-
The next step in this load testing example is to define your service level objectives, or SLOs, around your application performance. SLOs are vital to ensure the reliability of your systems and applications. If you do not currently have any defined SLAs or SLOs, now is an excellent time to consider your requirements.
-
You can define SLOs as Pass/Fail criteria with thresholds in your k6 script. k6 evaluates them during the test execution and informs about the threshold results. If any of the thresholds in our test fails, k6 will return with a non-zero exit code, communicating to the CI tool that the step has failed.
-
Now, we will add one threshold to our previous script to validate that the 95th percentile response time must be below 500ms and also that our error rate is less than 1%. After this change, the script will be as in the snippet below.
import http from 'k6/http';
import { sleep } from 'k6';

export const options = {
  duration: '1m',
  vus: 50,
  thresholds: {
    http_req_failed: ['rate<0.01'], // http errors should be less than 1%
    http_req_duration: ['p(95)<500'], // 95 percent of response times must be below 500ms
  },
};

export default function () {
  const res = http.get('https://quickpizza.grafana.com/');
  sleep(1);
}
Thresholds are a powerful feature providing a flexible API to define various types of Pass/Fail criteria in the same test run. For example:
- The 99th percentile response time must be below 700 ms.
- The 95th percentile response time must be below 400 ms.
- No more than 1% failed requests.
- The content of a response must be correct more than 95% of the time.
Check out the thresholds documentation for additional details on the API and its usage.
After writing test case and running it locally , now we will configure GitHub Actions , so that we can automate our K6 Tests
Setting up the GitHub Actions workflow
To have GitHub Actions pick up and execute our load test, we need to create a workflow configuration and place it in .github/workflows. Once this file has been pushed to our repository, each commit to our repository will result in the workflow being run.
name: k6 Load Test

on:
  push:
    branches:
      - '**' # Here we can sepcify the branch name for granularity

jobs:
  run-test:
    runs-on: ubuntu-latest
    steps:
      - name: Checkout
        uses: actions/checkout@v4

      - name: Setup K6
        uses: grafana/setup-k6-action@v1
      - name: Run local k6 test
        uses: grafana/run-k6-action@v1
        with:
          path: test.js
NOTE
k6 has official GitHub actions to make it easy to execute your load tests.
- Lets understand the Github Action pipeline
- Setup k6 action: This action allows you to install and configure k6 in the pipeline easily. You can use it to customize what version of k6 you want or optionally configure a browser to easily run k6 browser tests.
You can use the following options with this action to modify its behavior:
k6-version: Specify the k6 version to use – for example, ‘0.49.0’. If not set, the latest k6 version will be used.browser: If set totrue, a chromium browser is set up along with k6, allowing you to run k6 browser tests. By default, it is set tofalse.
- Run k6 action: This action allows you to execute k6 tests with ease. You can use it to execute multiple test scripts in parallel, run cloud test runs, automatically add a comment on a PR with URLs to test run results, and more.
The following action inputs can be used along with the action:
path: Glob pattern to select one or multiple test scripts to run.cloud-run-locally: Iftrue, the tests are executed locally and the results are uploaded to Grafana Cloud k6, our fully managed performance testing platform powered by Grafana k6. By default, it istrue.parallel: Iftrue, and multiple tests are executed, all of them run in parallel.fail-fast: Iftrue, the whole pipeline fails as soon as the first test fails.flags: Additional flags to be passed on to the k6 run command, e.g.,--vus 10 --duration 20scloud-comment-on-pr: Iftrue, the workflow comments a link to the cloud test run on the pull request (if present). By default, it istrue.only-verify-scripts: Iftrue, only check if the test scripts are valid and skip the test execution.
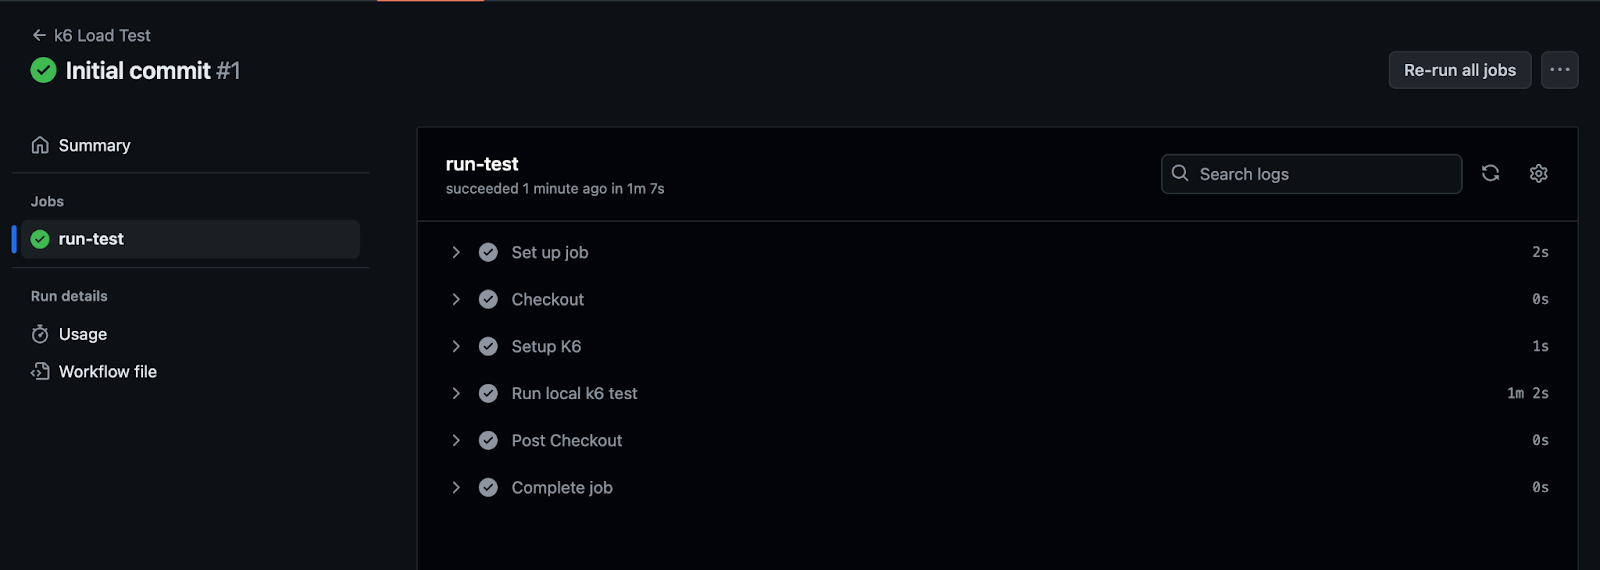
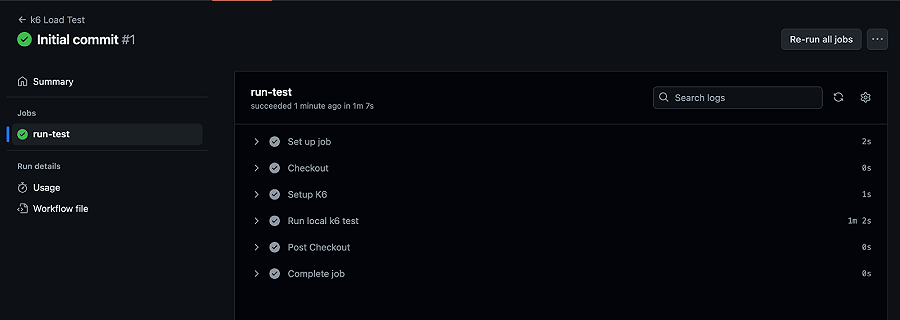
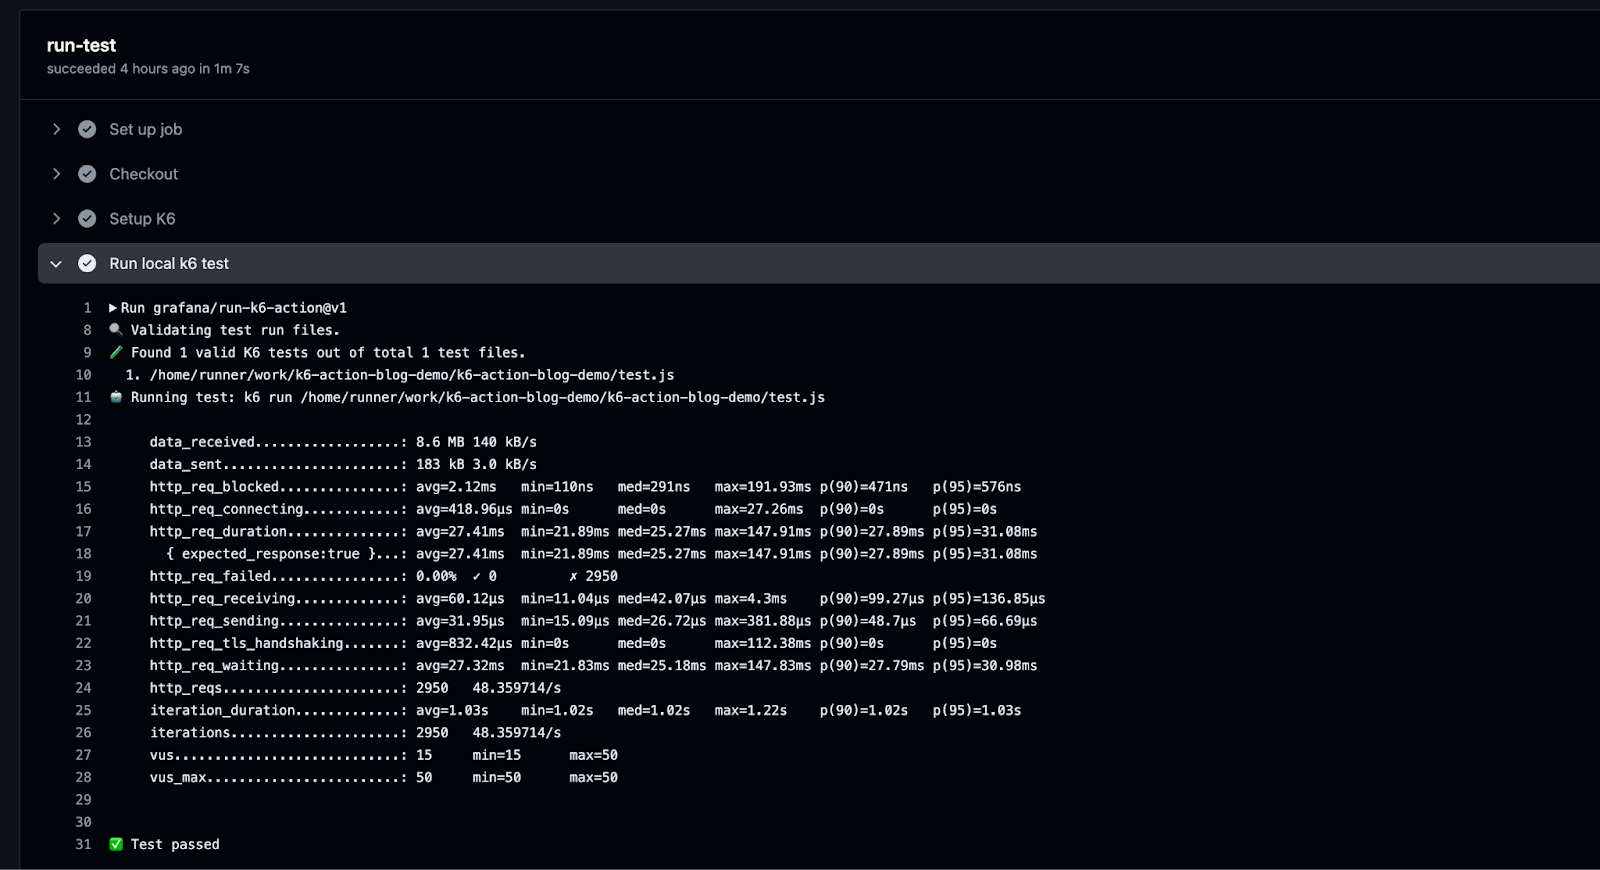
This is a Github Actions pipeline where the K6 test are running over it
Running cloud tests
There are two common execution modes to run k6 tests as part of the CI process.
- Locally on the CI server.
- In Grafana Cloud k6, from one or multiple geographic locations.
You can also run k6 tests locally on the CI server, and then push the results to Grafana Cloud k6.
Try it locally first
- Before we start with the configuration, it is good to familiarize ourselves with how cloud execution works. We recommend you test how to trigger a cloud test from your machine.
- Check out our cloud execution guide to learn how to distribute the test load across multiple geographic locations and for more information about the cloud execution
Now, we will show how to run cloud tests using GitHub Actions. If you do not have an account with Grafana Cloud already, you can sign up for a free one today.
After that, get your account token and add it to your GitHub project’s Secrets page by going to Settings > Security > Secrets and Variables > Actions > Secrets.
We also need to specify the project ID where the test run should be stored. To do this, grab your project ID and store it as a GitHub action secret or define it directly in the workflow.
We will pass the token and project ID to the k6 action via environment variables.
- name: Run local k6 test
  uses: grafana/run-k6-action@v1
  env:
    K6_CLOUD_TOKEN: ${{ secrets.K6_CLOUD_TOKEN }}
    K6_CLOUD_PROJECT_ID: ${{ secrets.K6_CLOUD_PROJECT_ID }}
  with:
    path: test.js
Running a test locally and pushing results to Grafana Cloud k6
Once you add the token and project ID environment variables to the GitHub action, this is the default execution mode. Here, the test is executed locally in your pipeline, allowing you to test your system without deploying it anywhere, and the results are pushed to Grafana Cloud k6.
The following is a sample workflow executing this kind of test.
name: k6 Cloud Load Test

on:
  push:
    branches:
      - '**'

jobs:
  run-cloud-test:
    runs-on: ubuntu-latest
    steps:
      - name: Checkout
        uses: actions/checkout@v4

      - name: Setup K6
        uses: grafana/setup-k6-action@v1
      - name: Run local k6 test
        uses: grafana/run-k6-action@v1
        env:
          K6_CLOUD_TOKEN: ${{ secrets.K6_CLOUD_TOKEN }}
          K6_CLOUD_PROJECT_ID: ${{ secrets.K6_CLOUD_PROJECT_ID }}
        with:
          path: test.js
Once we commit and push these changes, k6 will run the cloud test, and output the URL to our test results as part of the workflow logs.
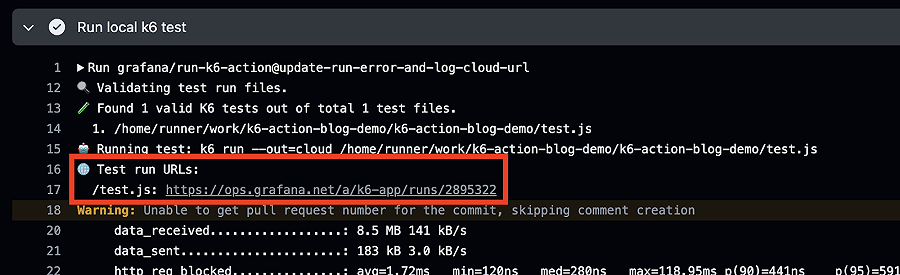
And if we copy the highlighted URL and navigate to it in a new tab:
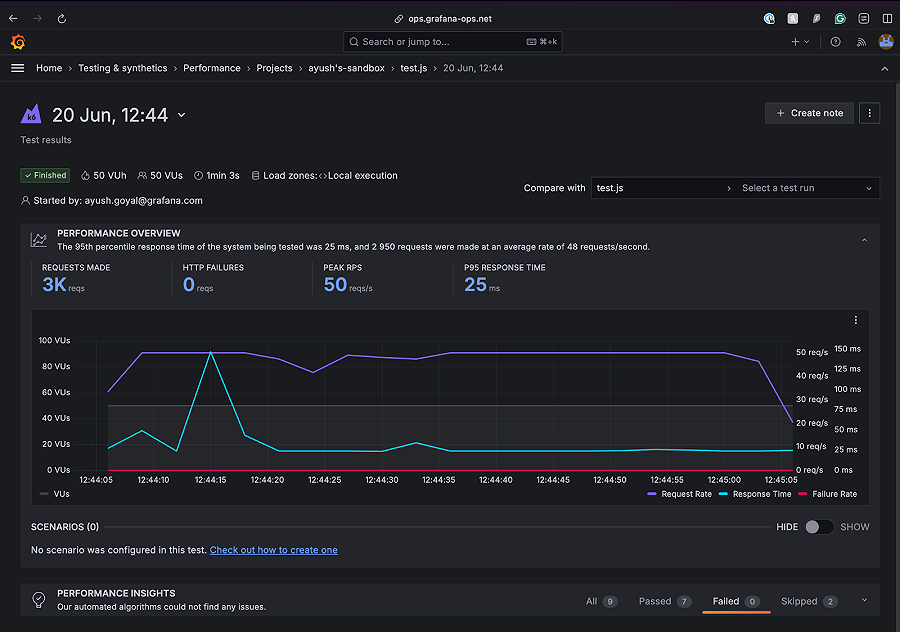
Running a test on Grafana Cloud k6
You might want to use cloud tests in these common cases:
- You’re going to run a test from multiple geographic locations (load zones).
- You’re going to run a high-load test that will need more compute resources than available in the runner.
The only change in the workflow compared to running test locally and pushing results to the cloud is to set cloud-run-locally for the action to false. This will now execute the test on Grafana Cloud k6.
name: k6 Cloud Load Test

on:
  push:
    branches:
      - '**'

jobs:
  run-cloud-test:
    runs-on: ubuntu-latest
    steps:
      - name: Checkout
        uses: actions/checkout@v4

      - name: Setup K6
        uses: grafana/setup-k6-action@v1
      - name: Run local k6 test
        uses: grafana/run-k6-action@v1
        env:
          K6_CLOUD_TOKEN: ${{ secrets.K6_CLOUD_TOKEN }}
          K6_CLOUD_PROJECT_ID: ${{ secrets.K6_CLOUD_PROJECT_ID }}
        with:
          path: test.js
          cloud-run-locally: false
Comment cloud test run URLs on the PR
In both the cloud execution modes discussed above, if the commit is associated with an open pull request, the action will automatically try to add a comment on the pull request with the cloud test run URLs.
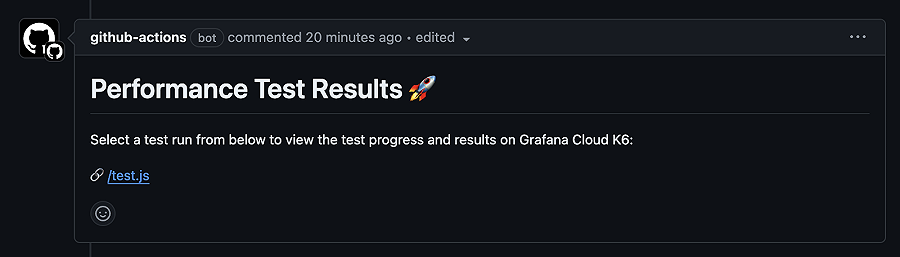
To disable this behavior, set the action input cloud-comment-on-pr to false.
If the comment is not being created for you, make sure the GitHub action has write permissions on the repository. Follow the instructions from the official GitHub docs to update the permissions for the GITHUB_TOKEN to have read and write permissions
Learn more
To learn more about Grafana k6, you can check our technical documentation, as well as our GitHub repository. And if you need any help, or want additional info, please feel free to reach out on our community forum. Happy testing!
Grafana Cloud is the easiest way to get started with Grafana k6 and performance testing. We have a generous forever-free tier and plans for every use case. Sign up for free now!